Thursday, March 22, 2012

Cute handy Bag

I found out how to make this cute handy bag. That has things that you might need including:
a comb, band aids, wipes, pony tail holders, chap stick, sticky notes and a pen, and much more. Here is a picture.
You start by getting a pretty potholder. Here is the one I used.
You can chose any side of your pot holder to show on the front. After you have your potholder, you need ten miniture baggies. Place one baggie on the right side of your potholder. Then overlapping the baggie just a little, put another baggie on the left side, like this picture shows:

 Then continue to put down right then left, until you have done ten baggies. Make sure you overlapped the baggies about an inch. Then you will need to pin it in the center of your overlapped baggies. Then being careful not to separate the baggies from each other. Bring the potholder with the baggies on it to your sewing machine, and sew across the overlapped baggies on a medium zigzag stich all the way across, and knot it at the end. The inside should look like this.
Then the outside should look like this:
 You should have ten baggies sewn onto your potholder. Then you need to sew a button on. Your button should be big. I used this kind:
On the opposite side of your potholder, loop find the center top and place your button there, making sure that the button will fit around it. Then sew it on it should look like this:

 Here comes the best part, here is where you get to fill your bag. You can fill it with any thing small you might need. Here is some of the stuff I put in mine. But there is a lot more you can stick in there.
 

I really enjoyed making this bag here is the inside of mine. 

I hope you like making this bag as much as I did.
 

Monday, March 19, 2012

Investigate The Possibilities Experiment Challenge


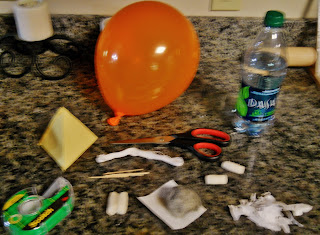
     I am really excited about doing this experiment Investigate The Possibilities Experiment Challenge. here is the link.  http://thehomeschoolscientist.com/  I am experimenting on bending streams of water. Here is the picture of the things you need and the list:  


       A Rubber balloon, Bottles ( that will form a stream of water, Paper  (torn into little pieces), Pieces of wool or fur,  string, scissors, one inch Styrofoam ball, (two) one half inch Styrofoam balls, Four tooth picks , and finally a tetrahedron. The experiment didn't show a pattern for one but I found how to make a tetrahedron out of a envelope at this website: http://tremor.nmt.edu/activities/origami/tetra.html 
 Now here is how you do the experiment:
     Charge a rubber balloon by rubbing your wool over it. Next move the balloon over the small pieces of paper. Did some of the paper move? 

       Touch your hand firmly on the balloon in some places. Place  over the paper. Did the paper move again? I guessed that the paper moved because of the static electricity the first time but when you rubbed the balloon it took all of the electricity away and it did not cause the paper to move. When I did this experiment the balloon charged by the fur caused the paper to move around a little. But when I rubbed my hand on the balloon it didn't move the paper.

     The next experiment was to see if charging your balloon and putting the charged balloon by a steady stream of water like this: 

      See if the water bends. I guessed that the water would bend because the balloon was charged by the fur and caused electricity in moving the water. 

      For the last experiment you need your tetrahedron. Here is a picture of it: 
   
      After you have your tetrahedron you need four toothpicks, and one inch Styrofoam ball. (I used to packing peanuts and taped them together for the one inch ball and they worked okay.) Then you open your tetrahedron like this:

     Then stick your one inch ball into the tetrahedron and close it back up. Next you want to stick a tooth pick in the top of the tetrahedron and push it slightly through the Styrofoam ball where the top of the tooth pick is sticking out of the top. Then you need to do that again but this time do it in the three corners where the stick into the ball. Then you need to open the tetrahedron and take the Styrofoam connected to the toothpicks out it should look like this:  

The instructions I got for this were a little hard but I will explain them a little better. you need your one inch all and both of your one half inch balls take the toothpicks off of the one inch Styrofoam ball then place your half inch ball on the top right side of your ball. Then stick one tooth pick into the one inch ball and the one half inch ball then place your other ball on the top left corner of the one inch ball stick the tooth pick in. once both of the half inch balls are on the one inch ball it should look like a teddy bear face. this teddy bear face represents a water molecule the one inch ball is the oxygen, and the two half inch balls are the hydrogen  
Here is my teddy bear except I had to use Styrofoam packing peanuts because we didn't have Styrofoam  balls but Styrofoam peanuts work just as well but the bear is kinda pointy.

    I really enjoyed doing this Experiment it was a lot of fun. 

Saturday, August 6, 2011

Our Animals

     This morning while I was feeding all of our many animals. I was thinking of ways to keep them cool for the day. So I gave water to our horse, I stuck a bowl of water up in the play house by our cats, I sprayed our dogs and horse with the water hose, and I watered our plants.

     We have one horse named Dusty.We have eight cats; five of them are kittens. The kittens names are Prince Charming, Roly Poly, Sam Jr, Bobby, and Snow White. The other cats names are Tiger, Sally,  and Gabriel. We have two dogs;their names are Sandy, and Bingo. We have three bunny's named Fluff, Skipper, and Thumper. we have six chickens; they don't have names. They are just called the chickens. We have two ducks: Donald and Speckles and Three hermit crabs: Tommy, Hermie, and Jingles. Those are all of our animals.